
Introduction
When I set out to build a website from scratch, I know that getting lost in code or overwhelmed by options is all too easy. Over the past decade, I’ve helped launch dozens of sites—from simple portfolios to complex e‑commerce platforms. Today, I’ll walk you through my proven seven‑step process. I’ll answer the questions I hear most often (“Which hosting should I choose?”, “How do I keep my site secure?”, “What about SEO?”) so you can move forward with confidence.
By the end of this guide, you’ll have a clear roadmap: from defining your goals and choosing a domain, to design, development, optimization, and ongoing maintenance. Let’s dive in!
Step 1: Define Goals & Audience

Before you write a single line of HTML, ask yourself: Why am I building this site? and Who will visit it?
I always start with a short workshop—just me, a notebook, and a timer. In 10 minutes, I sketch answers to these prompts:
-
Primary Goal: Sell products, collect leads, share content, or showcase work?
-
Key Metrics: Number of monthly visitors, form submissions, or sales?
-
Audience Traits: What does my ideal visitor look like—age, interests, technical comfort?
Why It Matters
When you build a website from scratch with a crystal‑clear purpose, every decision—layout, content, calls-to-action—aligns with that goal. For example, if your focus is lead generation, your navigation should guide users to a prominent contact form.
Quick Persona Creation
Create 2–3 simple personas:
-
“Startup Steve”: Entrepreneur seeking marketing tips, tech-savvy, values speed.
-
“Blogger Beth”: Writes about travel, needs easy‑to‑use CMS, mobile focus.
-
“Shopper Sam”: Buys products, looks for trust signals and smooth checkout.
By the end of Step 1, you should have a one‑page document: goal, KPI, and personas. Keep it handy—it will steer all later steps.
Step 2: Secure Your Domain & Hosting

Think of your domain and hosting as land and foundation. A shaky host or confusing domain can derail you before you start.
Choosing the Perfect Domain
-
Keep It Short & Memorable: Aim for 2–3 syllables (e.g., “TechThinker.com”).
-
Pick the Right TLD:
.comremains king, but consider niche TLDs like.techor.shop. -
Privacy Protection: Enable WHOIS privacy to shield your personal info from spammers.
Pro Tip: Register your domain for multiple years to boost trust signals in Google’s eyes.
Comparing Hosting Types
| Hosting Type | Pros | Cons | Ideal For |
|---|---|---|---|
| Shared | Very affordable (<$5/mo), easy setup | Resource contention, slower speeds | Simple blogs, hobby sites |
| VPS | Dedicated CPU/RAM, SSH access | Requires some sysadmin knowledge | Growing businesses |
| Cloud | Auto‑scaling, pay‑as‑you‑go | More complex configuration | Traffic‑variable apps |
| Managed WP | WP‑tuned servers, auto‑backups, expert support | Premium cost ($20–$100+/mo) | Professional blogs, stores |
In 2025, top managed WordPress hosting providers include built‑in Core Web Vitals dashboards and one‑click headless‑mode setup—handy if you plan to decouple your front end later.
Step 3: Plan Your Site Architecture

A thoughtful structure is key for both user experience and SEO. I recommend tackling sitemap and URL structures early.
Crafting a Sitemap
Open a blank canvas—paper or whiteboard—and draw a tree:
-
Home
-
Services
-
Blog
-
Category A
-
Category B
-
-
About
-
Contact
-
This visual helps you spot redundancies, unnecessary levels, and clarifies navigation.
Defining URL Structure
-
Use hyphens, not underscores (
/blog/web-design-tips) -
Keep URLs concise and keyword-focused
-
Implement breadcrumb trails for user orientation and SEO boost
By planning your architecture now, you’ll avoid painful rewrites later when that 50th blog post is due.
Step 4: Design Brand & UX
Design isn’t just aesthetics; it’s how you convey trust and guide actions.
Building Your Visual Identity
-
Color Palette: Choose one dominant brand color, two complementary accent hues, and one neutral (e.g., dark gray).
-
Typography: Pick two web‑safe fonts via Google Fonts—one for headings, one for body text.
-
Logo & Favicon: Even a simple text‑based logo adds professionalism.
Wireframes & Prototypes
I sketch low‑fidelity wireframes in 20 minutes, then quickly build clickable prototypes in Figma. This lets me test basic flows—home to contact, blog to article—before writing any code.
Real‑world check: Show your prototype to a colleague or friend. Ask them to find the “About” page in under 10 seconds. If they struggle, rethink your menu.
Ensuring Accessibility
-
Contrast: Aim for a minimum 4.5:1 contrast ratio for text.
-
ARIA Labels & Keyboard Navigation: Add
aria-labelattributes to icons and ensure all interactive elements are reachable via Tab. -
Responsive Breakpoints: Test layouts at 320px, 768px, and 1024px widths to cover phones, tablets, and desktops.
Step 5: Develop & Add Content
Now that design is settled, it’s time to choose your platform and populate your site.
Platform Setup
-
WordPress: Download the latest version from WordPress.org, or use a one‑click installer from your host.
-
Headless/Static: Clone a Next.js or Hugo starter repo if you prefer code‑centric workflows.
Theme Customization
I typically start with a lightweight starter theme—like Underscores for WordPress or a clean Next.js template—and apply my brand’s CSS variables. This strikes a balance between fast development and custom look.
Writing Engaging, SEO‑Focused Content
Your content should answer reader questions immediately. For the keyword build a website from scratch, follow this pattern:
-
Use it in your H2/H3 subheadings.
-
Include it in your first paragraph (“When you build a website from scratch…”).
-
Scatter it naturally throughout body text—aim for roughly 1% density.
Example Bullet List for Rich Snippets
-
Benefits of building from scratch:
-
Full design control
-
Lean, fast-loading code
-
Tailored SEO structure
-
No legacy plugin bloat
-
Optimizing Media
-
Format: Convert images to WebP or AVIF (< 100 KB).
-
Alt Text: Use descriptive text like
alt="build a website from scratch"to reinforce SEO. -
Video Embeds: Use responsive embed wrappers for YouTube or Vimeo.
Step 6: Optimize Performance & SEO
A slow site loses visitors and rankings. Here’s how I dial in speed and search optimization.
Speed & Core Web Vitals
-
Server‑Level Caching: Enable Redis or NGINX micro‑caching.
-
CDN Integration: Offload assets to Cloudflare or AWS CloudFront.
-
Lazy‑Loading: Defer off-screen images and iframes.
-
Measure: Use Google Lighthouse and WebPageTest to target scores ≥ 90.
On‑Page SEO Checklist
-
Title Tag: Starts with “Build a Website from Scratch”
-
Meta Description: Under 160 characters, includes focus keyword
-
Subheadings: H2/H3 tags with keyword variations
-
Internal Links:
-
External DoFollow Links:
Technical SEO & Schema
-
Generate an XML sitemap and submit to Google Search Console.
-
Create a
robots.txtto guide crawlers. -
Add structured data for FAQ, breadcrumbs, and articles using Schema.org markup.
Step 7: Test, Launch & Maintain
Even rock-solid sites need continuous care.
Quality Assurance
-
Cross‑Browser Testing: Verify in Chrome, Firefox, Safari, Edge.
-
Real‑Device Checks: Use BrowserStack or physical devices.
-
Automated Tests: Implement Cypress or Selenium scripts for key flows (form submissions, login, checkout).
Launch Day Checklist
-
Update your DNS records (A, CNAME) to point at your host.
-
Verify SSL certificate installation via Let’s Encrypt or commercial CA.
-
Confirm analytics tracking (Google Analytics 4) and conversion goals.
Ongoing Maintenance
-
Weekly Updates: Core, plugin, and theme patches in a staging environment first.
-
Daily Backups: Off‑site retention for 30+ days.
-
Uptime Monitoring: Services like UptimeRobot alert you to downtime.
-
A/B Testing: Use Google Optimize or VWO to refine headlines and CTAs.
-
Scaling When Needed: Transition to container clusters or auto‑scaling cloud instances as traffic grows.
Read Also
- Start a WordPress Blog
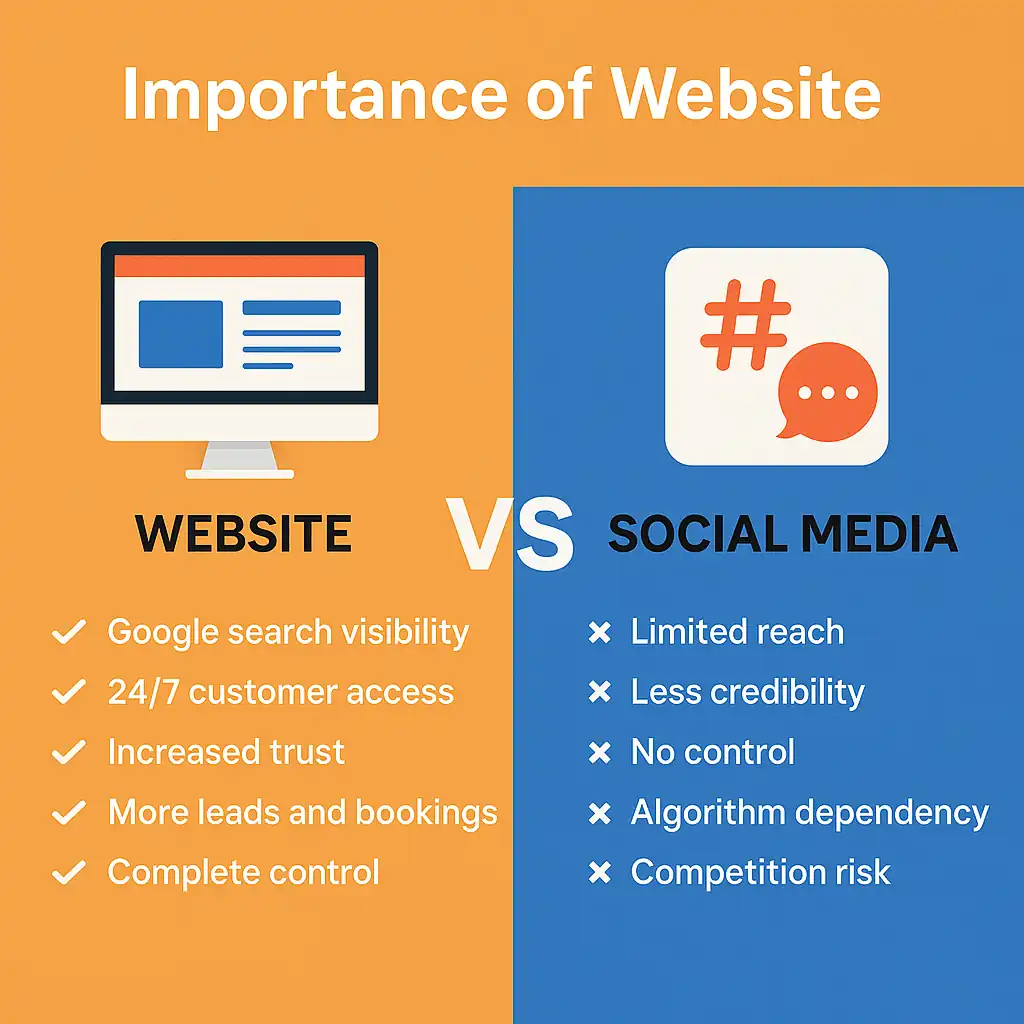
- Importance of Website
- Secure Your WordPress Website
- Core Web Vitals LCP FID and CLS
- Best WordPress Hosting in India
External Reference
-
MDN Web Docs – Learn HTML
Comprehensive, up‑to‑date tutorials on HTML fundamentals and best practices:
https://developer.mozilla.org/en-US/docs/Learn/HTML -
Google Developers – Web Fundamentals
Official guide to modern web development, including performance, accessibility, and SEO:
https://developers.google.com/web/fundamentals
Conclusion
Building a website from scratch in 2025 means balancing creativity, performance, and security. By following these seven steps—and leveraging modern tools—you’ll launch a professional, high‑performing site that delights users and ranks well. Remember, a website is never “done.” Keep iterating, testing, and optimizing, and you’ll see your hard work pay off in traffic and conversions.
Ready to start? Bookmark this guide and refer back as you navigate each phase. Happy building!
Frequently Asked Question on build a website from scratch
1. What does it mean to build a website from scratch?
Building a website from scratch means creating every component yourself—no pre‑built themes or drag‑and‑drop builders. You control:
-
HTML/CSS structure and styling
-
JavaScript behaviors and interactive features
-
Server setup (hosting, databases)
-
Design assets (graphics, fonts)
2. Do I need coding skills to build a website from scratch?
Yes, basic coding helps—but you can start small:
-
HTML & CSS for structure and styling
-
JavaScript for interactivity (menus, sliders)
-
Optional: A framework like React or Vue for dynamic sites
3. What’s the first step to build a website from scratch?
Define your foundation:
-
Purpose & goals: blog, portfolio, e‑commerce
-
Audience personas: demographics, tech comfort, needs
-
KPIs: pageviews, form submissions, sales
4. How do I choose a domain when I build a website from scratch?
Follow these rules:
-
Keep it short & memorable (2–3 syllables)
-
Prefer
.comor niche TLDs (.tech,.design) -
Enable WHOIS privacy to protect personal data
5. Which hosting is best for a site built from scratch?
Compare four types:
-
Shared: $3–$10/mo, easy, but slower
-
VPS: $20–$50/mo, dedicated resources
-
Cloud: $10+ pay‑as‑you‑go, auto‑scaling
-
Managed WP: $20+ optimized for WordPress
6. How should I plan site architecture from scratch?
Map your site like a tree:
-
Home → Services → Blog → Contact
-
Keep nav to 5–7 top pages
-
Use breadcrumb trails for clarity
7. What tools help me design before I code?
Use prototyping tools:
-
Figma or Adobe XD for wireframes
-
Sketch for high‑fidelity mockups
-
InVision for clickable demos
8. How do I ensure my custom design is responsive?
Adopt mobile‑first breakpoints:
-
320 px (phones)
-
768 px (tablets)
-
1024 px (desktops)
And use flexible units (%, rem) instead of fixed pixels.
9. How can I optimize images when I build a website from scratch?
Follow these guidelines:
-
Compress to WebP or AVIF (< 100 KB)
-
Use srcset to serve appropriate resolutions
-
Lazy‑load off‑screen images
10. What are Core Web Vitals when building from scratch?
Key metrics by Google:
-
LCP (Largest Contentful Paint): < 2.5 s
-
FID (First Input Delay): < 100 ms
-
CLS (Cumulative Layout Shift): < 0.1
11. How do I add SEO on a scratch‑built site?
Implement on‑page and technical best practices:
-
Title tags & meta descriptions with “Build a Website from Scratch”
-
Clean URL structure (
/build-website-from-scratch) -
XML sitemap & robots.txt submission
12. What security measures are vital for a site built from scratch?
Harden your site by:
-
Enforcing HTTPS with SSL/TLS and HSTS
-
Installing a WAF (Cloudflare, Sucuri)
-
Implementing 2FA and rate‑limiting on logins
13. How do I test a site built from scratch before launch?
Perform multi‑layer QA:
-
Cross-browser (Chrome, Firefox, Safari, Edge)
-
Device testing (phones/tablets via BrowserStack)
-
Automated tests (Cypress, Selenium) for forms and flows
14. What’s a launch checklist for a newly built website?
Confirm these items:
-
DNS records (A, CNAME) are correct
-
SSL certificate is active and valid
-
Analytics & tracking (GA4) are firing
15. How do I maintain a site built from scratch?
Ongoing care includes:
-
Weekly updates to code, dependencies, and plugins
-
Daily backups stored off‑site for 30+ days
-
Uptime monitoring (UptimeRobot) with alerts